How to create an online course


If you’ve been wondering how to create an online course, we’ll walk you through the entire process.
With the rise of online course creators, more people are interested in how to start teaching online for a living. Is it profitable to sell online courses? Our answer would be yes. We’ve seen instructors acquire over five million customers and make more than $50 million in sales.
That said, when it comes to how to sell a video course, PDFs, templates, quizzes, live coaching, or other teaching resources, there are best practices to keep in mind. After analyzing over 12,000 course launches, we found a standard pattern that has been proven successful time and time again.
- Select your most profitable course idea
- Find your audience and define your outcome
- Set income goals and price your course
- Create great course content
- Choose your hosting platform
- Gather your tools and gear
- Grow your audience and email list
- Build a course sales page
- Launch your course
In this post, we’ll walk you through ideation, creation, launching, and more. Everything you need to know about how to create an online course and start making money is here.
Start small with a mini course. Then work your way up to more courses and more revenue. We’ve got a checklist to help you start with your first mini-course.

1. Select your most profitable course idea
For some, coming up with a course idea is the hardest part of the process. We all want a slice of that multi-billion dollar pie, but how do you know your online course idea is profitable?
We created a profitable course idea workbook to help you unleash your money-making course idea. Download our guide if you’re ready to:
- Diversify your income and become a thought leader in your space
- Elevate your online knowledge business
- Pinpoint the most profitable and creative idea

Believe it or not, everyone has an online course in them. We all have unique hobbies, passions, and skills that can translate into an online course. We have profitable teachers with courses ranging from cake decorating to watercolor painting.
When it comes to finding your profitable course idea, it can be broken down into three main questions:
- What do you know? Write down the topics that you’re passionate about, and consider the skills and experience that you possess.
- How will my course provide value? Validate your course idea with your target audience.
- What niche is right? Look at what exists already and niche down your topic.
Luckily, we focus on knowledge at Teachable. If you know a topic, you can create a profitable online course.
For example, perhaps you’re passionate about horticulture. While everyone may not be invested in aquaponics, some are dying to learn more about aquaponics.
You just need to find them.
2. Find your audience and define your outcome
Finding your audience is easy. Your audience may hang out in the same online spaces that you do. Whether you frequent horticulture subreddits or are active in Facebook groups, go there and ask about their struggles.
The power of transformation
Think about the transformation your course provides for your target audience. What outcome will students have after taking your course? As a course creator, you need to make that outcome apparent in your pitch to potential students.
Do your students want to learn all about aquaponic gardens? Maybe not. But if you can teach them how to set one up in their own home on a budget, that will get people excited!
Communicate your value clearly
To ensure that your customers value your course, present it clearly. You can tell them that you’ll teach them programming, and that’s fine and dandy. However, you’ll show them real value if you tell them instead that you’ll teach them programming so they can get a job that pays more and has more flexibility.
It’s great to advertise what your customers are going to learn. It’s even better if you can market your course and tell them what they will get from learning the skills you’ll teach them.
Take our quiz.
Find out whether you should create a cohort-based course or a self-paced course.
3. Set your income goals and price your course
Many creators have brought in attractive, sizable incomes through online courses. Setting clear income goals is important, but your goals should be more specific than “make money.”
Whether you’re hoping to make $1,000 or $10,000, keep that number in your mind while you’re pricing your course. You can systematically work backward to make sure you hit your revenue goal.
To make $10,000 from creating an online course you could either sell it for $10 to 1,000 students or for $100 to 100 students.
To make more money with an online course, the answer is simple: charge more.
We dug into the data and found that students hold courses that they’ve paid more for as being more valuable and thus, they are more likely to complete them. People oftentimes associate “cheap” with “low-quality” and will be less inclined to buy based on that perceived value.
There are many benefits to using premium pricing. Here are a few proven ones to consider:
- It’s easier to hit your income goals. You’ll make more with fewer students.
- Your students will get better results.
- Your students will be more fun (and easier) to work with.
There are many considerations when it comes to pricing, so we have an in-depth post on other pricing strategies here.
Charging more for your courses is one of the easiest and most important tactics you should take. However, there are other ways that you can make more money. We’ve built-in course features like upsells, course bundles, and more to help Teachable users increase course revenue.
4. Create great course content
You’ve got your idea and you’ve figured out pricing. Now you get to start creating your course.
When people set out to create an online course, this is often where they get stuck. They know what they want to teach, but implementing it is another story entirely.
The best way to plan your course is to write down every step that students would need to do in chronological order to get their desired outcome. Each step becomes a lesson in your course.
Keep in mind that the purpose of your course is to bring your students to a transformation, so plan your course accordingly. Each lesson should lead to that final outcome.
Building the curriculum
Once you’ve outlined your lesson topics, you’re one step closer to building a complete curriculum. You’ll probably spend the most time here, and it makes sense. Your course is your product.
Developing a full course curriculum can feel overwhelming, so complete it in small steps. For example, set aside at least 30 minutes a few days a week to develop a 10-minute lesson. When it’s broken up into smaller tasks, it feels easier to accomplish.
Also, remember that the curriculum you use after your first-course cohort can change and evolve. There will be opportunities to improve your content, so gather feedback from your students. Much of the feedback you receive will be things you wouldn’t have thought about or noticed without having real student experiences to pull from. It is completely acceptable to launch your course and adjust it later, so don’t let the fear of imperfection hold you back.
It is easier to sell an online course when you have an organized curriculum with learning objectives, milestones, lessons, and estimated hours to complete. You should include these specifics on the sales page so that potential students know what to expect and understand what is expected of them in terms of time, costs, and benefits.
If you still aren’t sure where to begin, you can follow our step-by-step guide on how to create a curriculum.
5. Choose your hosting platform
Of course, your course will need a home. Before you can launch, you’ll need to decide where you will host your content. At a minimum, the platform that you choose should house your course materials in various formats—video, PDF, and so on. It should also serve as a sales page, also called a landing page.
This will help potential students learn more about you and your course. It’s also where they will hit buy and make a purchase.
There are typically three options for hosting:
Online course platform
An online course platform is designed for creators. For instance, with Teachable, you’ll have everything you need to create and sell online courses, on your terms. You can sign up for free and start uploading your videos, PDFs, and other course materials right away.
There is also the option to host your site on Teachable. Alternatively, if you already have a website, Teachable can easily integrate with it.
Even though Teachable makes it easy to host your courses, you have control over your content and online business, which is a key point that marketplaces lack. (More on the specifics below.)
Self-hosting
With self-hosting, you set up everything yourself. You’ll need to set up and pay for a server to host your site. Then, you have to build the site, set up payment processing, design landing pages, and everything in between.
Self-hosting gives you the freedom to build your site how you like, but doing that also takes a significant amount of time and technical knowledge.
Marketplace
In terms of hosting, learning marketplaces like Udemy and Skillshare act similarly to YouTube. They host everything on their site, and you upload the videos. The appeal for some is that these sites have users and traffic, although, that doesn’t mean that those users will watch your video course.
We commonly see creators move away from marketplaces because the platforms take a significant portion of a creator’s revenue. Usually, these platforms compensate creators based on how many minutes of their videos visitors watch. After putting hours of time into a course, you could end up making pennies and dollars because the marketplace platform takes as much as 30% to 50%.
Tips for choosing where to build your school
When you’re figuring out how to create an online course, consider which features are not negotiable for you. Here is what many creators prioritize:
- An intuitive platform. Teachable allows you to create a beautiful academy that conveys trustworthiness and authority through clean design. Plus, it takes less than an hour to get everything online.
- Ownership of the course domain name. Do you want students to come directly to your website to look more professional?
- Mobile responsive. Creators may need a platform that reflects that, especially since around 30% of students may not take the course on a computer.
- Control over the school. This is probably the most critical point. Platforms like Udemy can discount your course without your knowledge or permission so that a $100 course will be sold for $10. Plus, they recently set a price cap on courses at just $50 (not premium pricing). They also deny you control over student data and email lists. Teachable gives you complete control over pricing and lets you collect student email addresses that you can take with you even if you stop teaching.
- Payments. Being able to accept payments from day one is essential. It only takes a few minutes to set up payments when you use Teachable. Plus, we can help manage taxes, affiliate payouts, and more.
All of the above is available on Teachable. If you are itching to make a course, but don’t have the money to invest, you can get started right now with a free Teachable plan.
6. Gather your tools and gear for video courses
People often ask: What equipment do I need to create an online course?
Voiceover slides
With Teachable, you can get started without fancy camera or microphone equipment. Teachable allows you to upload text, PowerPoints, keynote presentations, videos, and audio interviews—meaning that you can work with whatever medium you are most comfortable with.
To create slides, you can use templates from one of the below free services, and customize them with your own personal branding:
Most often we see instructors using a combination of both text and video. If you are voicing over slides, we recommend using a free tool like Loom or trying out Screenflow for Mac. Both allow you to voiceover slides, and you can edit the video afterward.
You can also easily set up a low-cost home video studio in the beginning. As your online course business grows, you can always invest in equipment but it isn’t needed to get started. Video content can seem intimidating, but with a bit of practice, you’ll start feeling like a natural.
Video equipment
If you want to invest in audio, video, or other recording equipment, we have some recommendations.
Microphones
- ATR2100x-USB – At around $79, Audio Technica’s ATR 2100 is a budget-friendly microphone that will connect directly to Mac and Windows via USB. Many creators use it for podcasting, streaming, and course voiceovers. If you want to explore other low-cost options, we also put together this list of the best affordable microphones for creators.
- Rode NT-1 or SM7B – If you want to splurge a little on your audio setup, consider these two microphones. Both are commonly used in professional studios. Many popular podcasters use the SM7B ($399), so you’ve likely seen it in action. The Rode price ranges from $199 to $229, so it’s still relatively affordable.
Cameras
- Logitech HD Pro Webcam C920 – Beginners may want to start with a simple webcam. They are easy to set up and are low-cost. Logitech’s webcam is under $60, and you can just clip it to your computer.
- Canon EOS M50 Mirrorless Vlogging Camera – Many YouTubers and content creators use the Canon EOS M50. At around $680, it’s a good starter camera.
- Nikon Z30 – A little more expensive than the Canon, Nikon Z30 is about $850 on its own. Although, for an additional $150, you get the creator kit, which includes accessories like a tripod, remote control, and mini-microphone.
- Panasonic LUMIX GH6 – The Panasonic LUMIX GH6 is a high-end camera that many professional YouTubers use. It takes crisp, clear videos and photos indoors and outside, but it is not beginner or budget-friendly. The camera body costs about $2,200. Lenses and other accessories come at an extra cost. If your course business focuses on creative production and the investment makes sense, it could be worth it.
Lighting
You can start off using natural lighting for your videos. All you need to do is set up near a window with the light facing you. However, natural lighting can be fickle. If you are filming during rainy days or early morning and evening hours, there may not be much daylight to work with.
It is a good idea to have backup lighting equipment, and there are a lot of affordable options. With a home studio, you’ll generally want to go with two lighting choices.
- Ring light – You’ve likely seen many makeup YouTubers use ring lights. They cast light on your entire face, and you can find them for as low as $30. However, some larger lights can be a few hundred.
- Umbrella lighting – You can get a low-cost studio light kit like this LimoStudio, 700W set for under $70.
Backdrop or green screen
If you have a space in your home or office to set up a background that reflects your brand and business, then you may not need a backdrop. However, if you don’t have a dedicated space or just want a simple background, you can do that with the help of a backdrop. If you plan to change your background through editing, grab a green screen. You can find a backdrop separately for as low as $35, or get an all-in-one studio kit that includes it along with lights.
Editing software
Once you record your videos, you may want to add or overlay them with images or text. You also may make mistakes during recording. Instead of completely redoing your course, you may be able to simply clean up and cut sections. To do that, you’ll need video editing software. The most popular choices are:
- Premiere Pro
- Final Cut Pro
- iMovie
When it comes to how to sell a video course, you may want to invest a little more into the production quality of your content. These tools can help give your courses a professional polish, but again, they aren’t required to get started.
7. Grow your audience and email list
You may have heard that you should build an email list for your business, but how do you do that exactly?
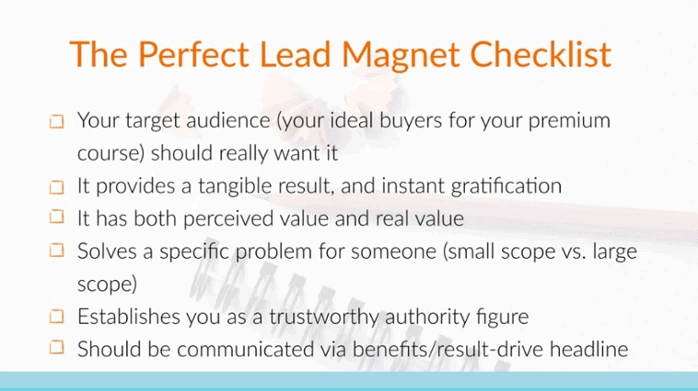
The fastest way to grow your email list is to give something away for free.
This free product will be your lead magnet, and it’s intended to draw in a targeted and interested audience.
This lead magnet will prove to your audience that you produce quality content and that you’re a trusted resource.
Here’s what you can give away:
- Ebooks
- Podcasts
- Membership in a valued community
- Or, our favorite, a mini course
Your lead magnet should be directly related to your online course content, so you attract your target audience. If you teach TikTok marketing, create a lead magnet for TikTok, not Facebook or another platform.
The mini course
With a mini email course, you can look at your full, ten-section course. Then, take the first section and repurpose it into a lead magnet. The people interested in your lead magnet will also be interested in your premium offering on the same topic.
Viral giveaways
Viral giveaways are another popular way to grow your email list. With software like KingSumo, you can give away a high-value prize pack. Make sure it’s specific to your course and grow your list like crazy. Viral giveaways are effective because entrants can share a link to your giveaway to get more entries, thus advertising your giveaway with zero effort on your part.
Ebooks
If you have a ton of blog posts on your course topic, compile them into an ebook to giveaway to your course audience. If you already have the content it will be nearly effortless to compile and convert to a PDF. From there you can set up landing pages and lead magnets on relevant posts and begin collecting emails.
Conversions
It’s usually safe to say that 2% of your email list will convert into paying customers. Going back to step two, we can figure out how large your list should be before you launch. If you need 100 students to reach your $10,000 goal, then you should aim to have a list of 5,000 before you launch.
We have four email list growth strategies that you can implement in seven days here.
8. Build a course sales page
Setting up your sales page is key to start making money online and creating your online course.

There are six assets that we recommend including to make your sales page as high-converting as possible:
- A headline: Tell us what your transformation is.
- Subhead: Go a bit more in-depth.
- A promo video: Optional, but recommended. A quick two-minute video can help add a face to your brand.
- An explanation of the course: Here is where you can go further in-depth and explain what your course is, what your students will gain from it, and why your course is the best course.
- Testimonials: If you have previous customers or fans of your brand who are willing to vouch for you, that can go a long way in creating social proof.
- Pricing: People need to know what they’ll be investing in to take your course. Teachable Payments makes setting up pricing easy.
Interested in more information on creating beautiful sales pages?
9. Launch your course
After all your hard work, it’s time to launch your online course. And, while it’s fun to experiment with different marketing techniques, we’ve found that when it comes to launching, a tried-and-true method always performs better. This is why we’ve created a plug-and-play email launch sequence for you.
It’s easy to implement, effective, and has been used by members of our community to make up to five figures on their launch.
The idea is simple: After building your email list and nurturing it with some free content (like blog posts, videos, etc.), you launch your course through a series of strategic emails. These emails work to build anticipation for your launch and the urgency to buy now.
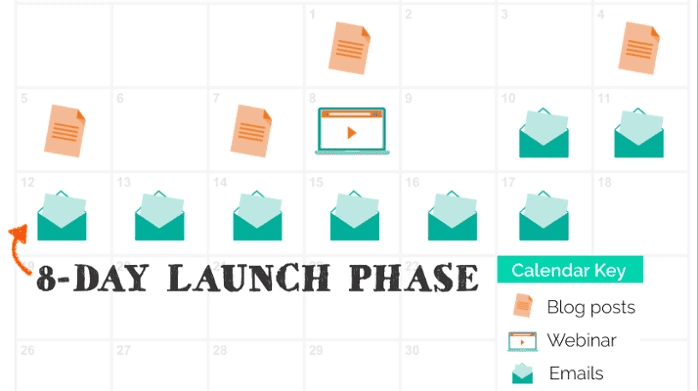
Here’s what the sequence looks like per day:
- Tease out your course
- Answer “What is the course”
- Tell your audience the course is open
- Answer FAQs
- Offer a surprise bonus for those that buy now
- Say thank you and show social proof
- Make a logical argument to buy now and say your course is closing
- Send three emails saying today is the last day
To make it even easier, we created a full step-by-step guide and email sequence template for launching a course.
Anyone can learn how to create an online course. However, you can increase your chances of success by leveraging this step-by-step guide. With Teachable, you can start building your course as soon as today when you sign up for a free plan.